In this tutorial you will make a Markdown editor with live preview using SwiftUI. This editor will run on both iOS and Mac. It’s a nice example to demonstrate how to create a document-based, multi-platform SwiftUI app. Plus, it shows how to use a WebKit web view in SwiftUI.
This tutorial uses the new document-based app features Apple added in Xcode 12. You must be running Xcode 12.2+ to create a multi-platform SwiftUI app. The iOS app requires iOS 14+, and the Mac app requires macOS 11+. If you are running macOS 10.15 (Catalina) on your Mac, you can still make the editor. You won’t be able to run the Mac version.
To keep the tutorial from getting too long, I will gloss over some steps and explanations that I covered in the following articles:
- Using Text Views in a SwiftUI App
- Create a Mac Markdown Editor with Live Preview
- Introducing the Swift Package Manager
Create the Project
Start by creating the project.
- Choose File > New > Project in Xcode.
- Click the Multiplatform button at the top of the New Project Assistant.
- Choose Document App from the list of application templates.
- Click the Next button.
- Name the project in the Product Name text field.
- Click the Next button.
- Choose a location to save the project.
- Click the Create button.
If you look at the project navigator, you will see Xcode creates the following folders for your project:
- The Shared folder contains files that both the iOS and Mac app targets use.
- The iOS folder contains files that the iOS app uses.
- The Mac folder contains files that the Mac app uses.
In the Shared folder are Swift files for the app, document, and content view.
Run the project and you will see that you have a working plain text editor. You can create documents, edit text, save documents, and load documents.
Add the Ink Package
This project uses the Ink Markdown parser to convert the Markdown you type in the text editor to HTML that you will preview. Ink has Swift Package Manager support to simplify adding it to your Xcode project.
Select the name of your project from the project navigator to open the project editor. Select the project from the project editor and click the Swift Packages button at the top of the editor to add the Ink package.
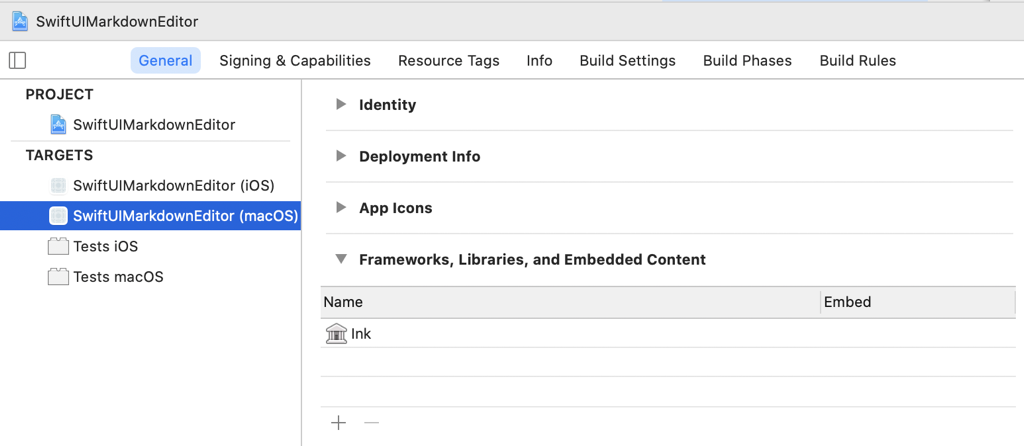
A current limitation in Xcode’s Swift Package Manager support is you can add a package to only one target initially. To add Ink to the other app target, select the target from the project editor and add the Ink framework from the Frameworks, Libraries, and Embedded Content section.
Add Web Views
To preview the Markdown you write, you need a web view to display the HTML. SwiftUI does not currently have a native web view so you must use a WebKit web view, WKWebView, for the preview.
WKWebView has both iOS and Mac support, but you’re going to have to create two web view files: one for the iOS app and one for the Mac app. The code is going to be almost identical. The reason you need two files is that SwiftUI has separate protocols for working with UIKit(iOS) and AppKit(Mac) views.
Create one new Swift file in the iOS folder in the project navigator and create a second file in the Mac folder. Make sure the file in the iOS folder is a member of the iOS app target. Make sure the file in the Mac folder is a member of the Mac app target. You can set the target membership for a file using the File Inspector on the right side of the project window.
Add the following code to the iOS Swift file:
|
1 2 3 4 5 6 7 8 9 10 11 12 13 14 15 16 17 18 19 20 |
import SwiftUI import WebKit struct WebView: UIViewRepresentable { var html: String init(html: String) { self.html = html } func makeUIView(context: Context) -> WKWebView { let webView = WKWebView() return webView } func updateUIView(_ uiView: WKWebView, context: Context) { uiView.loadHTMLString(html, baseURL: nil) } } |
The web view uses the SwiftUI and WebKit frameworks so you must import them. When you use a UIKit view in a SwiftUI app, the view must conform to the UIViewRepresentable protocol. The html property stores the HTML to display in the web view.
There are three functions. The init function initializes the web view with some HTML to display. The makeUIView function creates the web view. The updateUIView function loads the HTML string to show in the web view.
The Mac code is almost identical. Replace anything starting with UI with NS.
Parsing the Markdown
The next step is to write some code to parse the Markdown to HTML. Open the ContentView.swift file. Import the Ink framework.
|
1 2 |
import Ink |
Add the following computed property to the ContentView struct:
|
1 2 3 4 5 |
var html: String { let parser = MarkdownParser() return parser.html(from: document.text) } |
This code creates an Ink parser and calls a function that converts the document text into HTML. This code is much easier to write than creating your own Markdown parser.
Build the User Interface
The last step is to build the user interface. The user interface contains a text editor and a web view side by side.
The body property for the content view should look like the following code:
|
1 2 3 4 5 6 7 |
var body: some View { HStack { TextEditor(text: $document.text) WebView(html: html) } } |
The code creates a horizontal stack so the text editor and web view are side by side. The text editor is on the left and contains the document’s text. The web view is on the right and displays the HTML you parsed from the Markdown text. The iOS app uses the iOS version of the web view. The Mac app uses the Mac version of the web view.
Run the project. Any Markdown you type in the text editor will appear as HTML in the web view. The Ink parser does not currently support creating code blocks with indentation. You must add three backticks on the line above and below the code to create a code block.
I have the project on GitHub for you to look at if you run into problems.