Using environment variables in Swift
Explore the importance of environment variables in Swift and how to use them.

Environment variables are key-value pairs that can be used to alter the behavior of an application. The variables are part of the environment in which a process runs. The environment is injected during the runtime of the application. Environment variables can be set at the system level or they can be defined by the end-user.
Environment variables are commonly used for configuration purposes. It is possible to set different configuration values for development, testing and production environment. It is possible to use env vars as feature flags or to specify secrets and keys and keep them separate from the application codebase.
For example, an app could take advantage of the LOG_LEVEL=trace environment variable to set the log level using the Logging library in Swift. By using an env variable developers can get more detailed logs for debugging purposes and less verbose logs for production without changing the source code of the application itself.
How to access environment variables in Swift?
In Swift, it is possible to access environment variables using the ProcessInfo class. The ProcessInfo class is part of the Foundation framework.
Here's a quick example how to get the value of the LOG_LEVEL variable:
import Foundation

let env = ProcessInfo.processInfo.environment

let value = env["LOG_LEVEL"] ?? "trace"

print(value)
The process info's environment is represented a [String: String] dictionary. When requesting a specific key, the value is going to be an optional String type.
The output of this script is trace, if the LOG_LEVEL is not provided explicitly.
How to set environment variables?
There are several methods for configuring environment variables, and the approach you take depends on the specific tools you're working with.
Here are some typical scenarios for setting up custom environment variables.
Setting env vars using the command line
List the desired environment variables before the command when running a Swift package using a terminal window. Key-value pairs should be listed using the key=value format, separated by a single space character.
Here's how to define an explicit log level by using the swift run command:
LOG_LEVEL=debug swift run

// output: "debug"
The command above makes the LOG_LEVEL env variable set to trace for the swift run process. Traditionally environment variables are uppercased.
The export command extends the availability of an environment variable throughout the shell's entire lifecycle. Here's how to use it:
echo $LOG_LEVEL // output: ""

export LOG_LEVEL=info

echo $LOG_LEVEL // output: "info"

swift run

// output: "info"
The echo command is used to display variables in a shell script. Use the $ prefix and the name of the variable to access the value of it.
Setting env vars using Xcode
In Xcode, you can configure environment variables within the Scheme settings. The interface permits enabling or disabling specific key-value pairs for a particular run.
Here's how to reach the settings:
- Open the project in Xcode.
- Select the "Product" > "Scheme" > "Edit Scheme..." menu item.
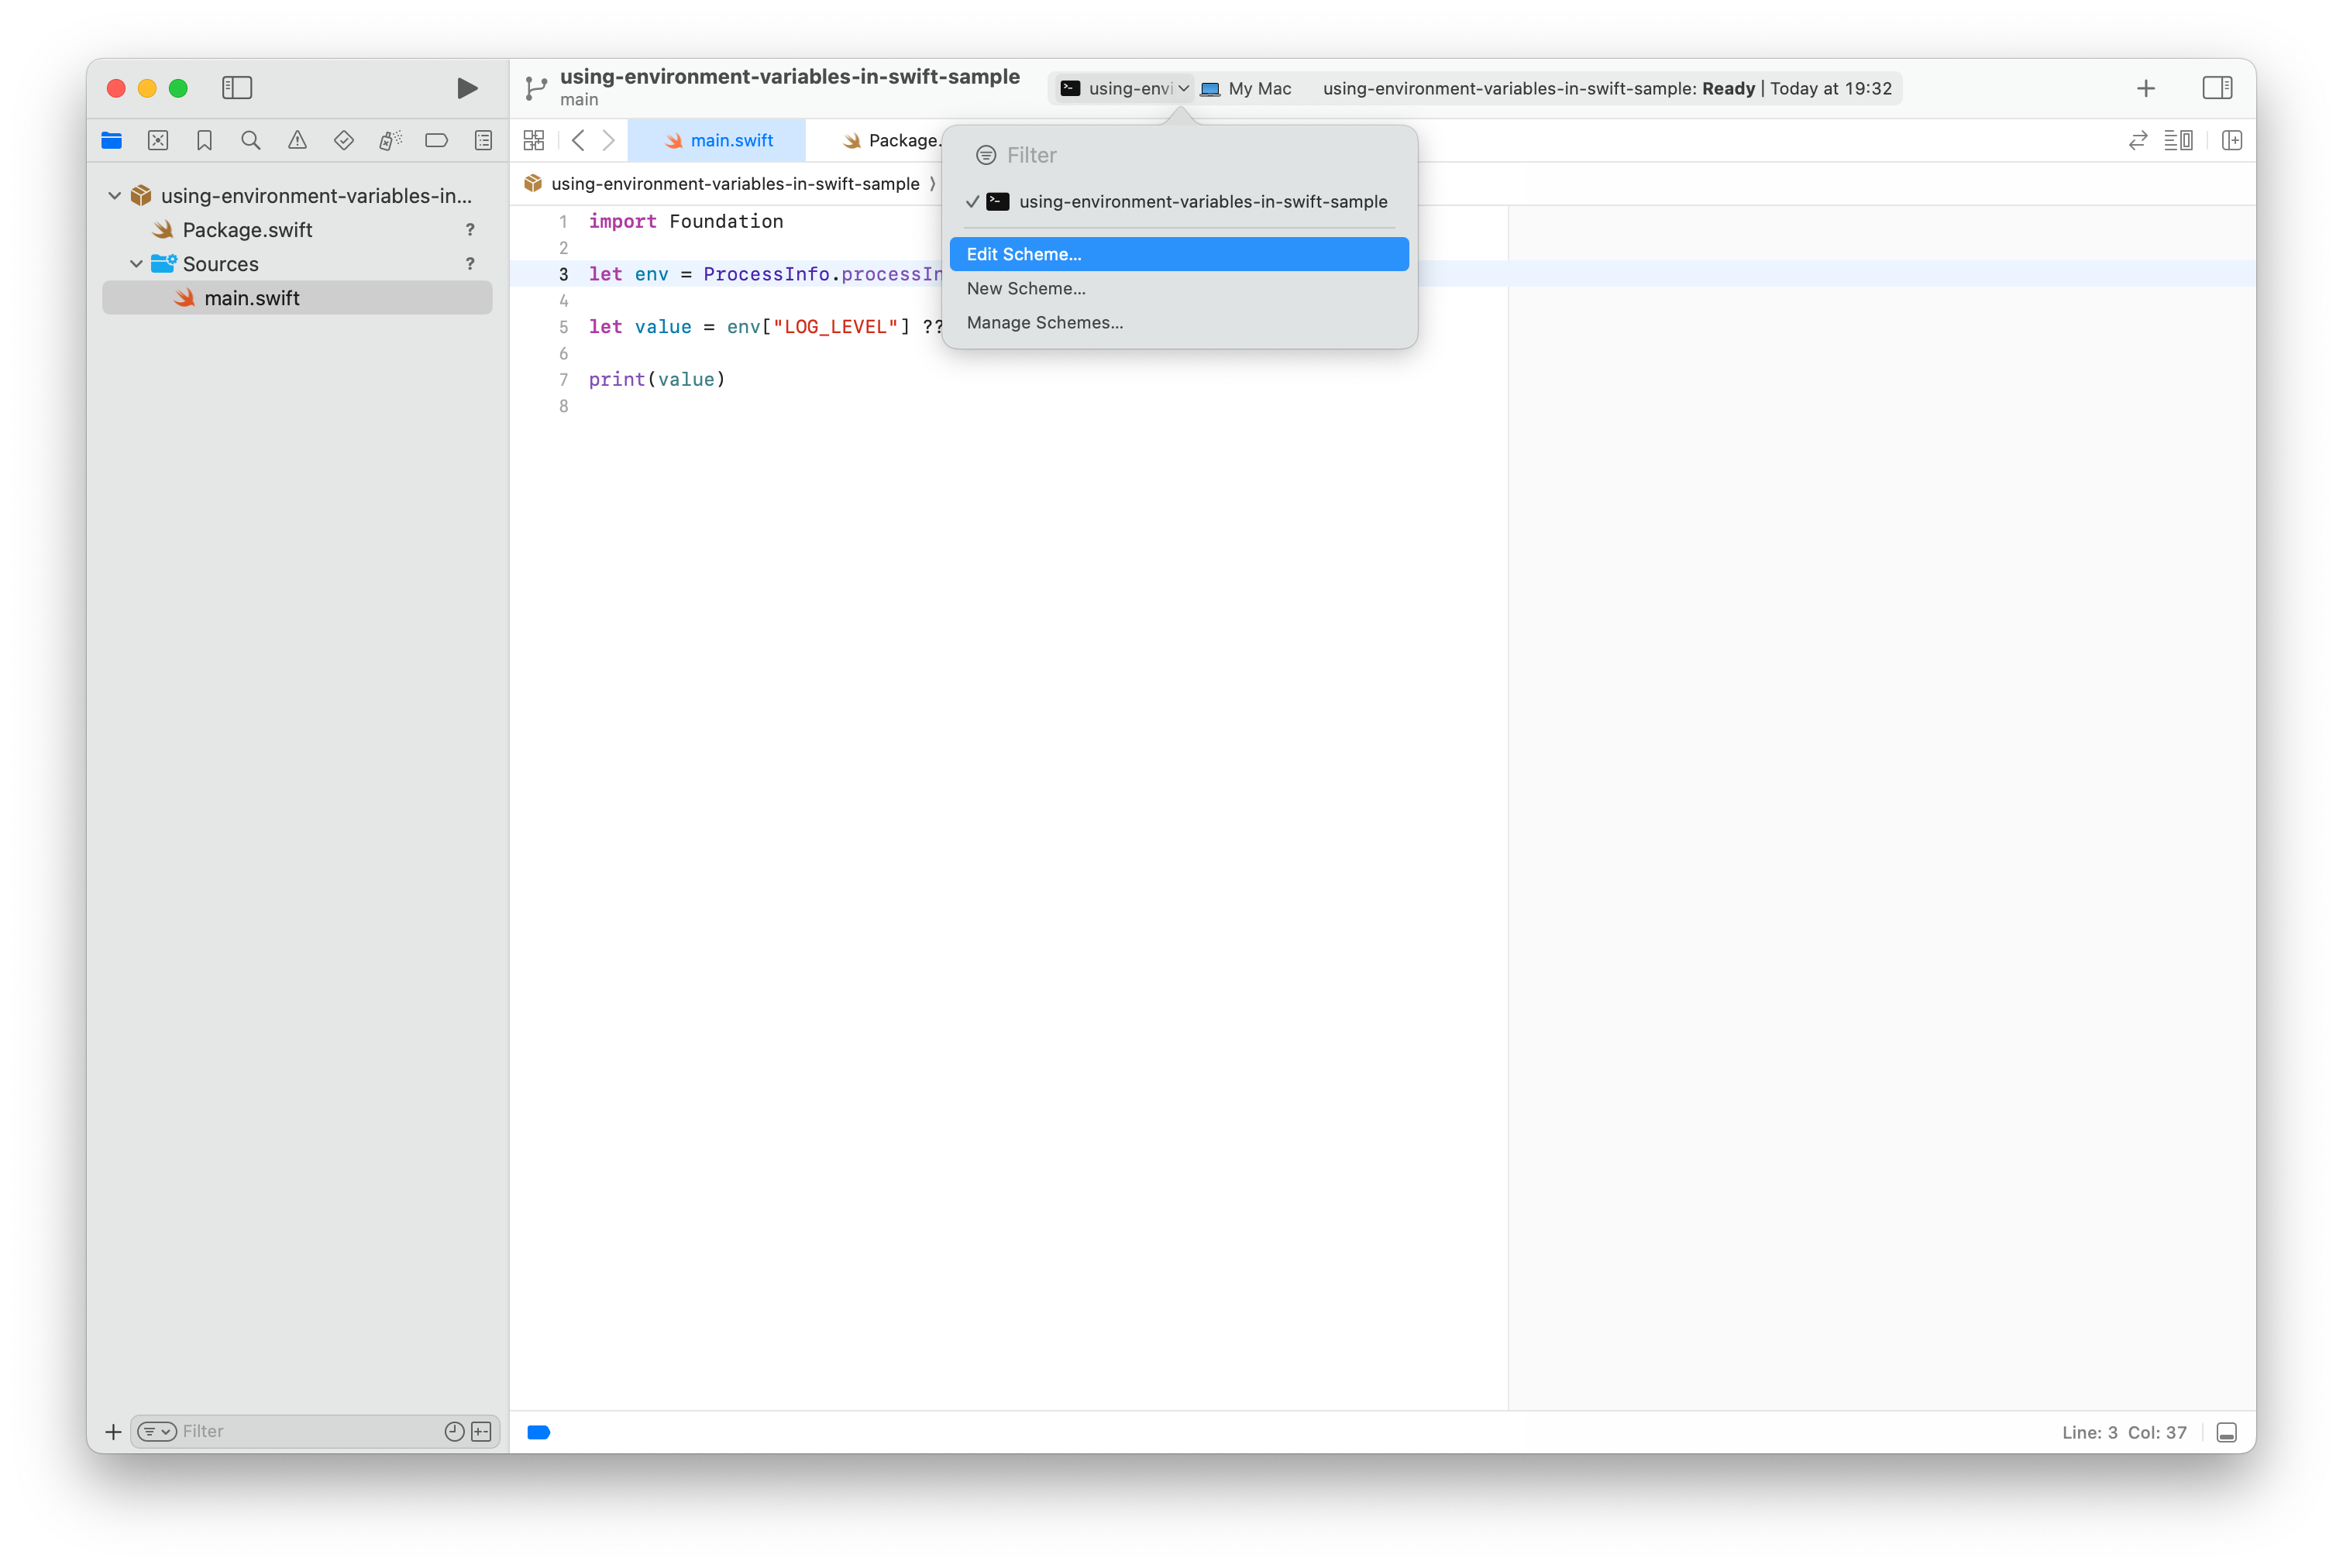
Alternatively, click on the Scheme name and select the "Edit Scheme..." menu item:

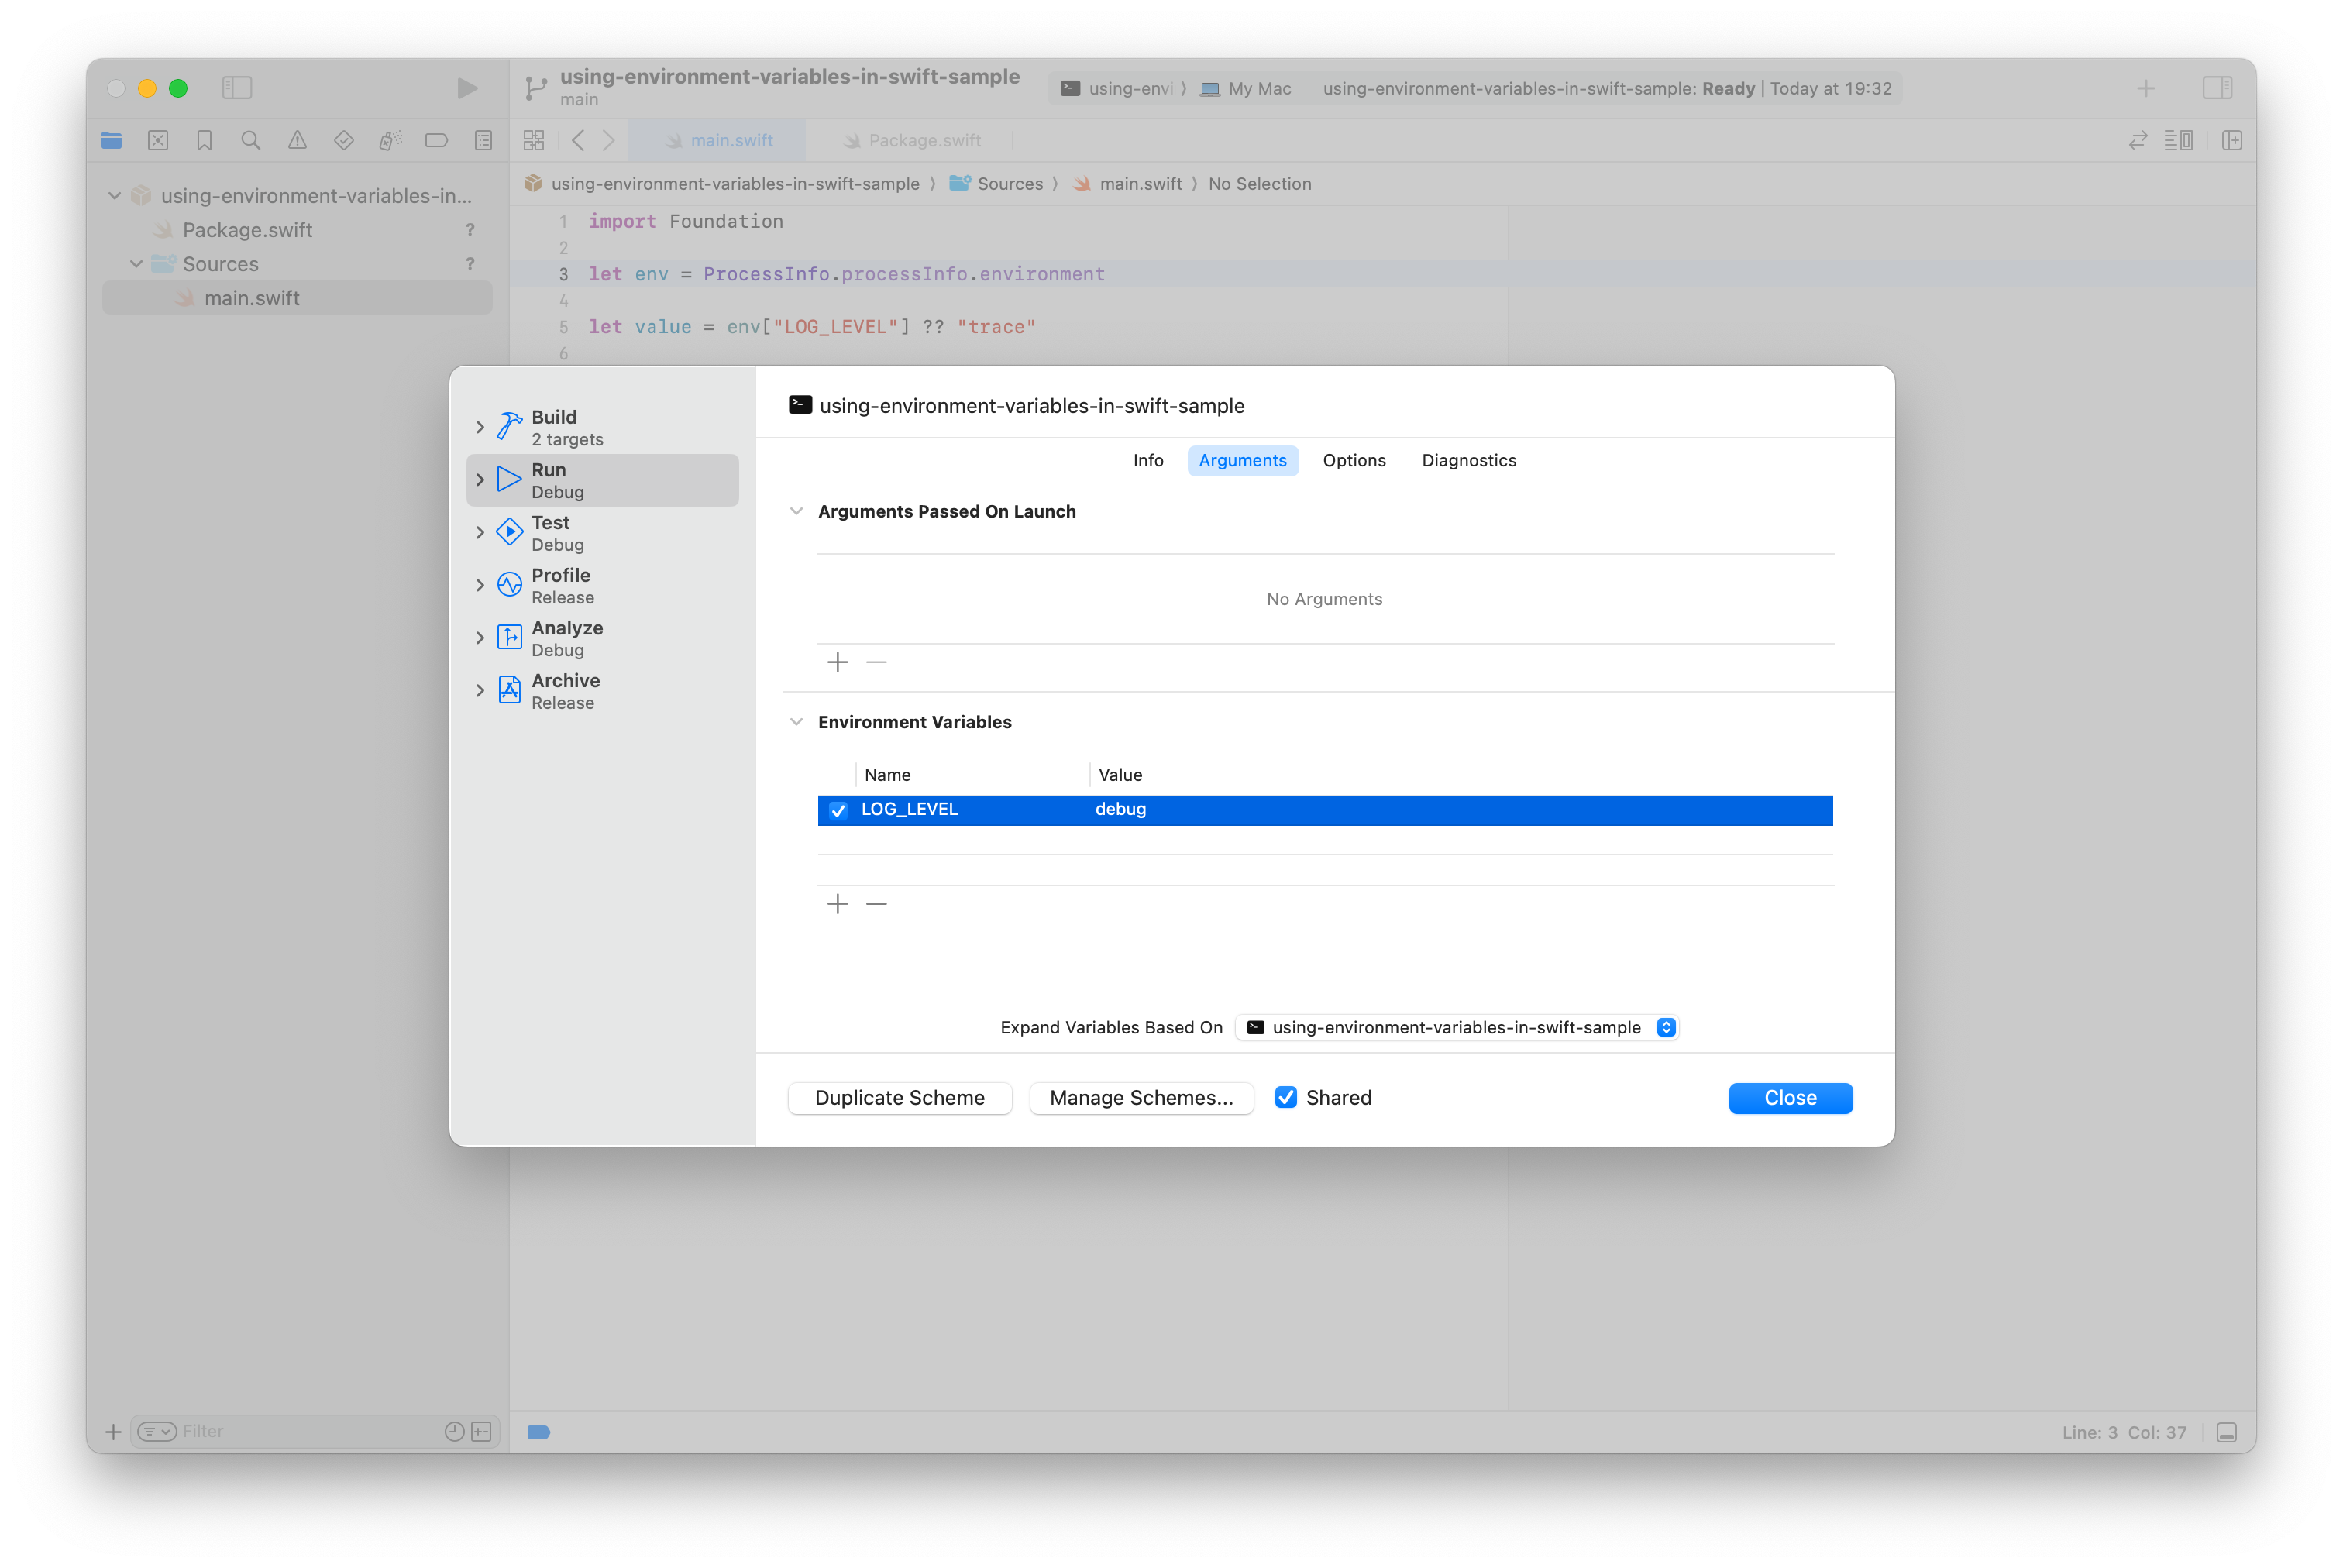
Inside the popup window:
- Select the "Run" option on the sidebar.
- Select the "Arguments" tab.

Finally, add a new entry into the "Environment Variables" section.
Click "Close" to get back to the project and press the "Play" icon to run the app.
Setting env vars using Visual Studio Code
It is possible to develop Swift projects with VSCode using the official Swift extension.
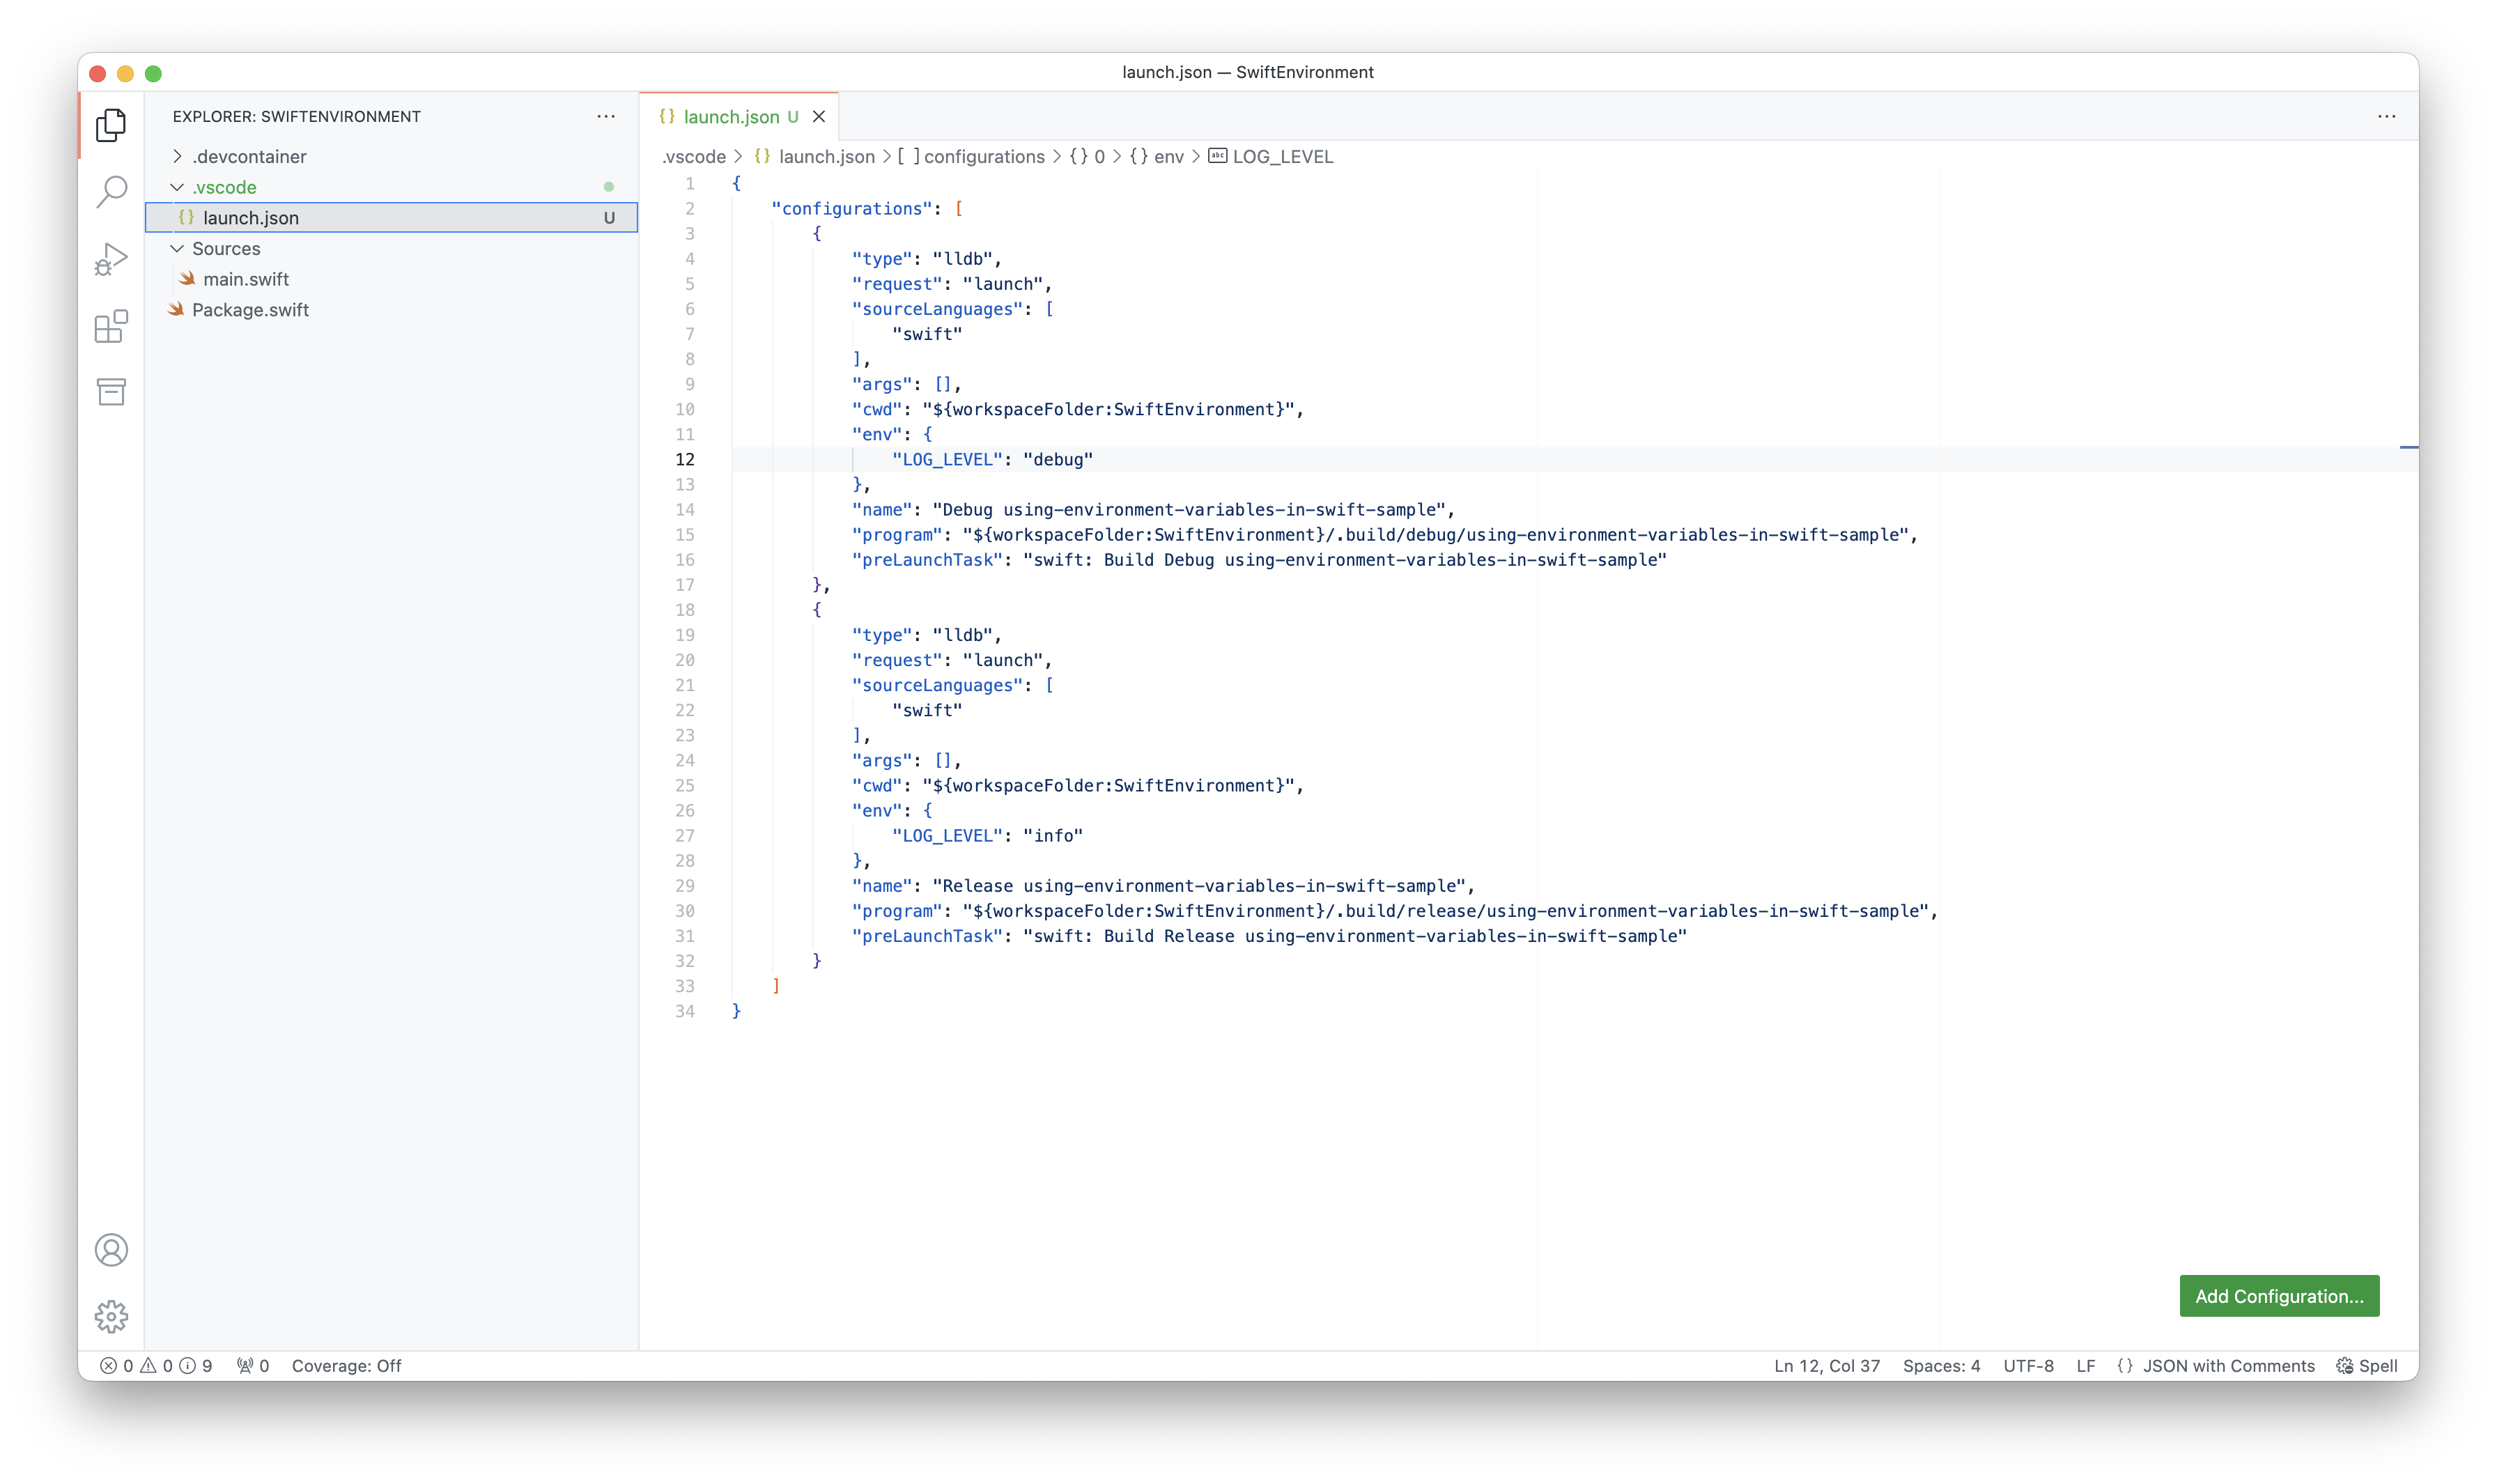
In order to set environment variables in the editor, open the .vscode/launch.json file in your workspace or select the "Debug" > "Open Configurations" menu item.
Inside the launch configuration file simply add to a new env property, if it's not present, with the desired key-value pairs:

Save the launch config and run the project using the "Play" icon inside the "Run and Debug" panel or using the "Run" > "Start Debugging" menu item.
Using dotenv files
A .env file is a text file commonly used to store environment variables for a project. It contains key-value pairs in the form of KEY=VALUE, where each line represents a different variable. Developers use libraries or tools to load the variables from the .env file into the application's environment. This allows the application to access these variables as if they were set directly in the system's environment.
NOTE: The .env files should be excluded from git using .gitignore.
The .env file provides a flexible and convenient way to manage environment-specific configuration settings in a project while keeping sensitive information secure and separate from the codebase.
Various open-source Swift libraries exist for server-side application developers, providing functionality to parse dotenv files. For instance:
Most of the modern web frameworks, have excellent support for loading dotenv files. Both Vapor and Hummingbird have a built-in solution to load and parse environment variables using these files.
Using the environment in Vapor
Vapor's Environment API enables dynamic configuration of the application:
import Vapor

// configures your application
public func configure(_ app: Application) async throws {

    // 1.
    var logger = Logger(label: "vapor-logger")
    logger.logLevel = .trace

    // 2.
    let logLevel = Environment.get("LOG_LEVEL")

    // 3.
    if let logLevel, let logLevel = Logger.Level(rawValue: logLevel) {
        // 4.
        logger.logLevel = logLevel
    }

    try routes(app)
}- Set up a new Logger instance, set the default log level to .trace
- Get the the raw log level as an optional String using the Environment
- Cast the log level to a
Logger.Levelenum, if it's a valid input - Set the log level based on the environment
Vapor will look for dotenv files in the current working directory. If you're using Xcode, make sure to set the working directory by editing the scheme.
Using the environment in Hummingbird 2
In Hummingbird, it is possible to use the shared environment or load dotenv files using the static dotEnv() method on the HBEnvironment struct:
import Hummingbird
import Logging

func buildApplication(
    configuration: HBApplicationConfiguration
) async throws -> some HBApplicationProtocol {

    var logger = Logger(label: "hummingbird-logger")
    logger.logLevel = .trace

    let env = HBEnvironment.shared
    // let env = try await HBEnvironment.dotEnv()
    let logLevel = env.get("LOG_LEVEL")

    if let logLevel, let logLevel = Logger.Level(rawValue: logLevel) {
        logger.logLevel = logLevel
    }

    let router = HBRouter()
    router.get("/") { _, _ in
        return "Hello"
    }

    let app = HBApplication(
        router: router,
        configuration: configuration,
        logger: logger
    )
    return app
}
If you run the project from Xcode, make sure you set a custom working directory, otherwise the framework won't be able to locate your dotenv file.
What's next?
Environment variables are crucial for modifying application behavior without code changes, offering flexibility across environments. They're commonly used for feature flags, secrets, and other configuration purposes. In our next article we will discover how to store secrets and API credentials in a secure way.
