Guarantee localization with SwitfUI
 Image by Karolina Grabowska from Pixabay
Manually testing our UI in search of localization bugs is a ridiculous thing to do in 2021. So what is it then? Why do we keep coming back to the same topic?
Prerequisites
The topic we’re about to discuss assumes a few things from your part in order to get the most of it such as basic knowledge of:
-
SwiftUI: it is the most recent UI framework from Apple. It allows us to build in a declarative fashion instead of good old imperative’s UIKit way has all of us used to. This is the first time I’m talking about it in this blog but there are countless resources out there to learn from. I won’t get into too many details.
-
Localization: Making our app be readable in multiple languages was covered in a [previous post][localizable]. Apple provides some tools to do this without too much hustle so again: details will be scarce.
-
Snapshot testing: I talked in detail in a previous medium post (sorry but that one it’s on Spanish only, let me know via Twitter if this is something you’d like me to go in detail). It’s simply the practice of saving screenshots of our UI’s different state in order to later compare them and be notified when something changes.
Case study
Let’s say we want to draw a simple list of steps for one hypothetical audio edition/publishing app.
//
// InstructionsView.swift
//
// Created by Mauricio Chirino on 23/10/21.
//
import SwiftUI
struct ItemRow: View {
let stepData: String
var body: some View {
HStack {
let icon = String(stepData.last ?? Character(""))
let name = stepData.dropLast()
Text(name)
Spacer()
Text(icon)
}
}
}
struct StepsModel {
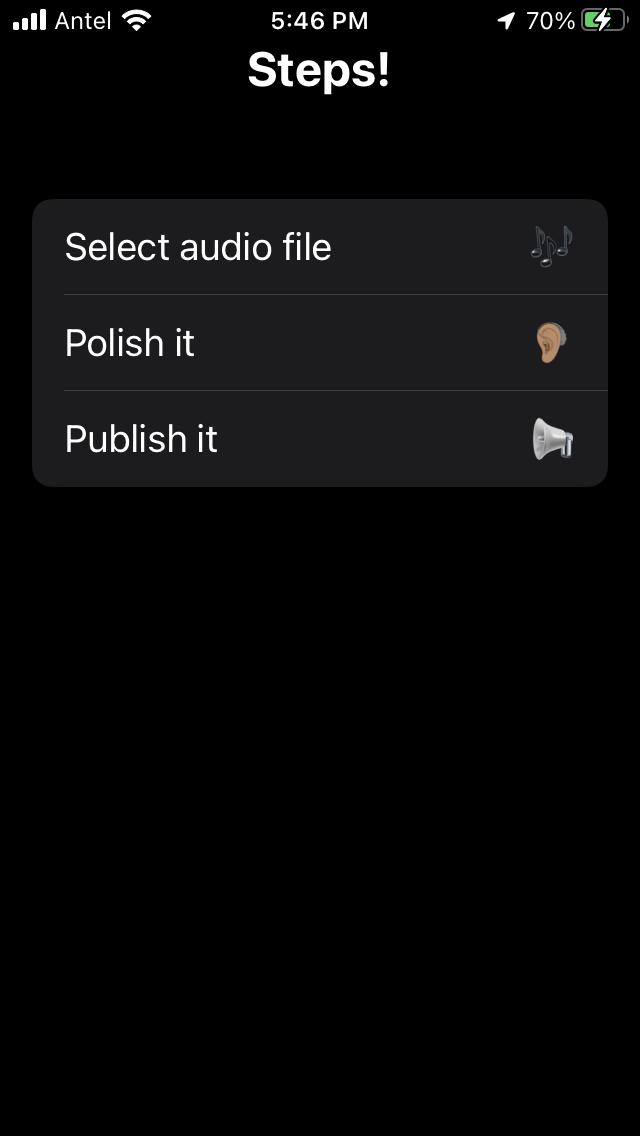
let dataSource: [String] = [
"Select audio file 🎶",
"Polish it 🦻🏽",
"Publish it 📢"
]
}
struct ContentView: View {
let stepsDataSource: [String]
var body: some View {
VStack {
Text("Steps!").font(.title2).bold()
List {
ForEach(stepsDataSource, id: \.self) { stepData in
ItemRow(stepData: stepData)
}
}
}.background(Color(.systemBackground))
}
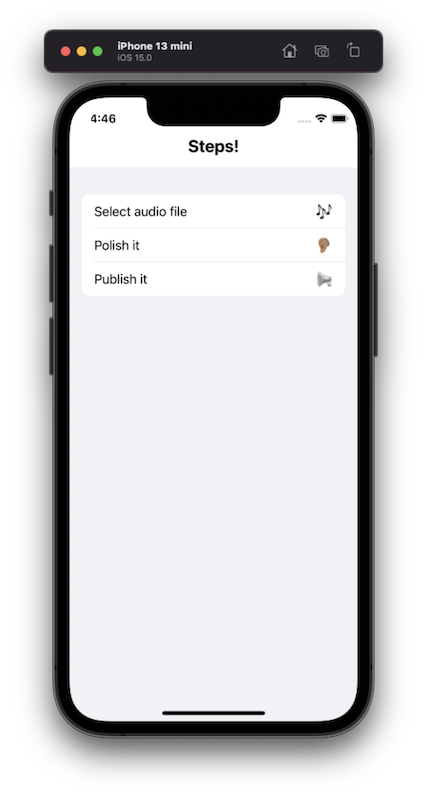
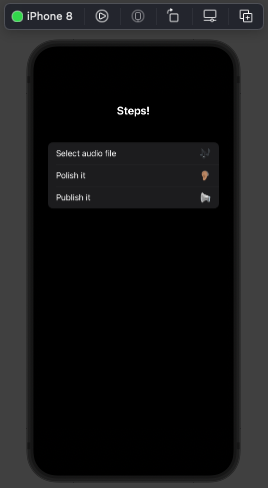
}This bit of code is enough to render this screen below
If you’re an old timer like me you might be wondering about UITableViewDataSource/UICollectionViewDataSource, AutoLayout or at least the ViewController. SwiftUI takes care of that, demanding from us only declaration of what has to be rendered, not how. Amazing, right?
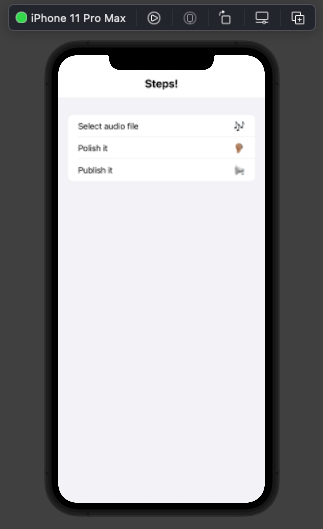
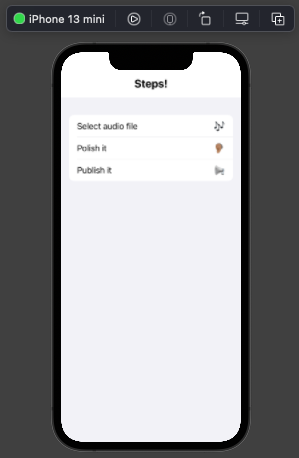
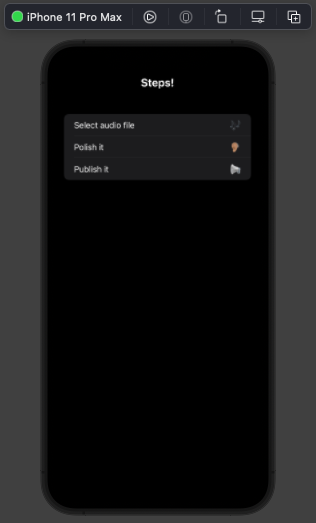
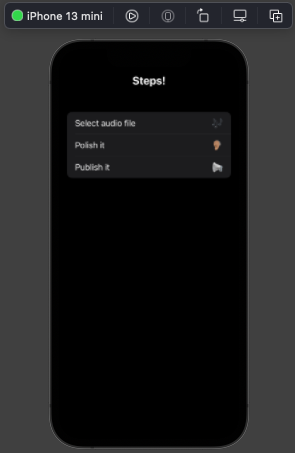
What about a preview of our UI in different devices in light and dark mode? SwiftUI also got us covered there 👇🏽
//
//  Preview.swift
//
//  Created by Mauricio Chirino on 24/10/21.
//

import SwiftUI

struct ContentView_Previews: PreviewProvider {
    static var previews: some View {
        let devices: [String] = [
            "iPhone 8",
            "iPhone 11 Pro Max",
            "iPhone 13 mini"
        ]

        Group {
            ForEach(devices, id: \.self) { name in
                ForEach(ColorScheme.allCases, id: \.self) { mode in
                    ContentView(stepsDataSource: StepsModel().dataSource)
                        .previewDevice(PreviewDevice(rawValue: name))
                        .previewDisplayName(name)
                        .environment(\.colorScheme, mode)
                }
            }
        }
    }
}
As a side note, running the following command on a terminal will print out all available simulators in our environment.
$ xcrun simctl list devicetypes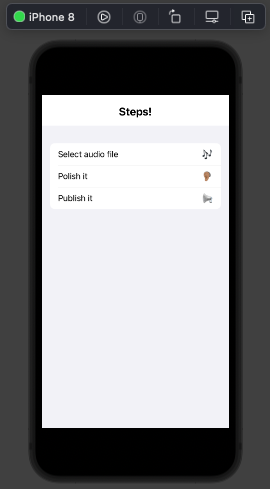 |
 |
 |
 |
 |
 |
All of the above was rendered alongside my code within Xcode as I was tweaking the code. A real game changer regarding time saving and productivity 🎉
The problem
“I don’t see the problem Mauri 🧐” you might be thinking. The above is all fine and dandy for small/prototype/side projects. The real issue arises with scale: what about multiple languages? Orientations (landscape/portrait)? Light and dark mode? Checking that no regressions are produce as the codebase grows? We need to introduce some automation in here!
Snapshot tests
This is where snapshot tests come in handy. In a nutshell: they take a screenshot of the device with the setup we provide and store it for later comparison. As soon as something in the UI changes without us intending to do so, said test would immediately fail (also providing a new screenshot for us to check what changed).
Let’s say we want to test in 3 different types of devices (an iPhone 8, 8+ and 12 Pro Max) for both light and dark mode, as well as landscape and portrait orientations.
import SnapshotTesting
import SwiftUI
import XCTest
@testable import LocalizationSwiftUI
final class LocalizationSwiftUISnapshotTests: XCTestCase {
func verifyRendering(for device: ViewImageConfig, style: UIUserInterfaceStyle = .dark, testName: String) {
// Given
let sut = ContentView(stepsDataSource: StepsModel().dataSource)
// When
let wrapper = UIHostingController(rootView: sut)
wrapper.overrideUserInterfaceStyle = style
// Verify
assertSnapshot(matching: wrapper, as: .image(on: device), testName: testName)
}
func test_initialRendering_forEnglishLocaleAtDarkMode() {
verifyRendering(for: .iPhone8, testName: #function)
verifyRendering(for: .iPhone8Plus, testName: #function)
verifyRendering(for: .iPhone12ProMax, testName: #function)
verifyRendering(for: .iPhone8(.landscape), testName: #function)
verifyRendering(for: .iPhone8Plus(.landscape), testName: #function)
verifyRendering(for: .iPhone12ProMax(.landscape), testName: #function)
}
func test_initialRendering_forEnglishLocaleAtLightMode() {
verifyRendering(for: .iPhone8, style: .light, testName: #function)
verifyRendering(for: .iPhone8Plus, style: .light, testName: #function)
verifyRendering(for: .iPhone12ProMax, style: .light, testName: #function)
verifyRendering(for: .iPhone8(.landscape), style: .light, testName: #function)
verifyRendering(for: .iPhone8Plus(.landscape), style: .light, testName: #function)
verifyRendering(for: .iPhone12ProMax(.landscape), style: .light, testName: #function)
}
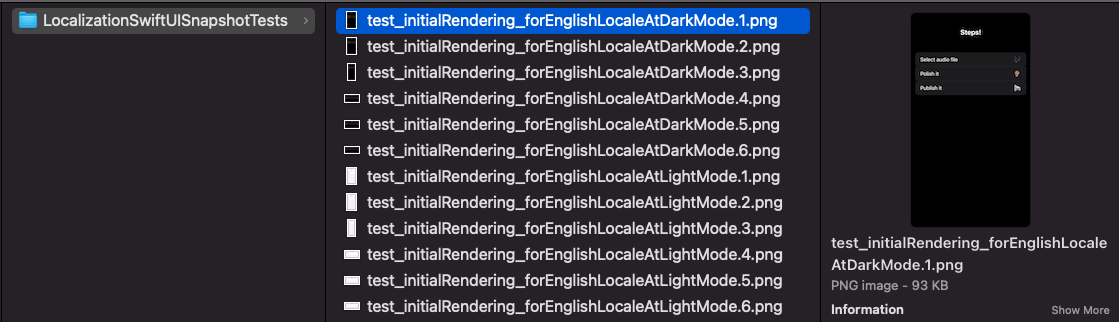
}The first time these tests are run, they failed because there’s no a single anchor image to make comparisons with. In this instance, all snapshots will be created and afterwards will fail only when something from the UI changes. The resulting anchors will sit next to our tests files inside our project
Proper localization
What if we need supporting another language? Let’s say Spanish to make things easy for the writer 😁🇻🇪
First of all, let’s replace the hard coded strings by keys from the language tables we’re adding for both English and Spanish, and access them using the same technique discussed in the localization post
/// Protocol intended to provide a key string localized for its respective value
protocol Localizable {
    /// Returns localized value should it be found defined with this matching key
    var key: String { get }
}

extension Localizable where Self: RawRepresentable, Self.RawValue == String {
    var key: String {
        NSLocalizedString(rawValue, comment: "")
    }
}

enum Translator: String, Localizable {
    case title
    case select
    case polish
    case publish
}

struct StepsModel {
    let dataSource: [String] = [
        Translator.select.key,
        Translator.polish.key,
        Translator.publish.key
    ]
}
Let’s see how it looks setting a device in Spanish:
 |
 |
Thanks to the test we added in the previous part, we are confident this change isn’t causing any regression. This is what a I call a proper refactor! 👏🏽
Test plans
This is only half of the solution in our scenario. Snapshots until this point are going to test in a single environment configuration. Having to manually setup a device or simulator in a specific context and then running a set of specifics test for it defeats the purpose of automation.
Enter test plans into the picture: they were introduced in WWDC 2019 with Xcode 11 as a way to organize our test environment. Let’s setup a test suite to cover both languages.
- We go to Product -> Scheme -> Edit scheme in order to convert our test suite in a test plan
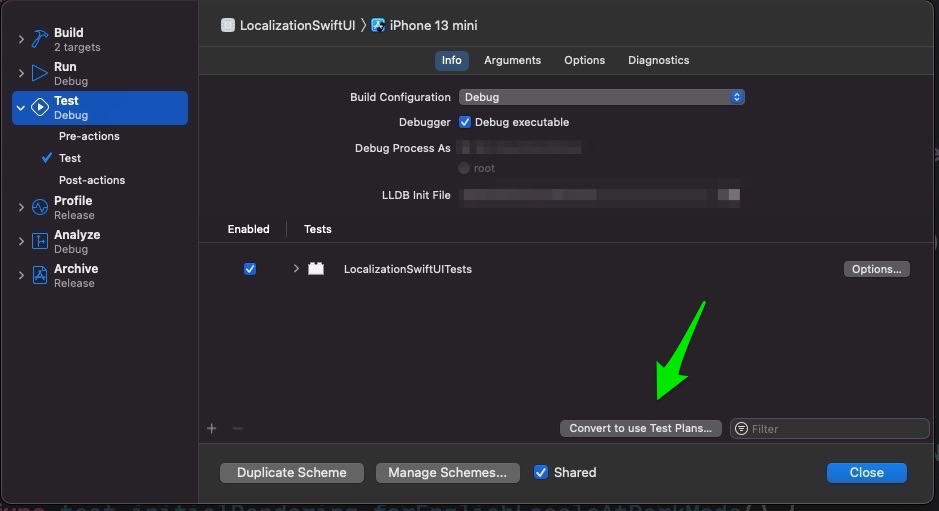
- Create a test plan from current scheme
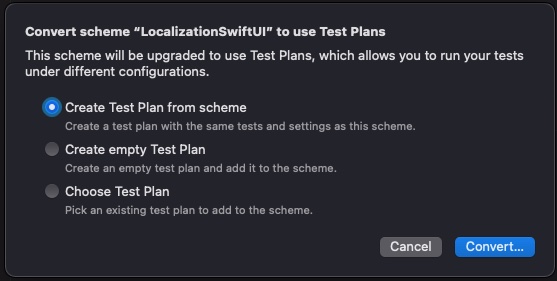
- Select the desired location
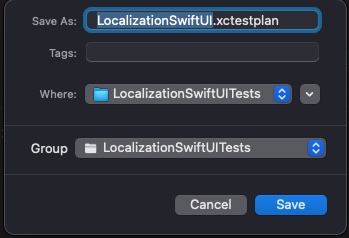
- After that, we can close the scheme window and the test plan setup window should be open. In it we’re going to setup our desired context
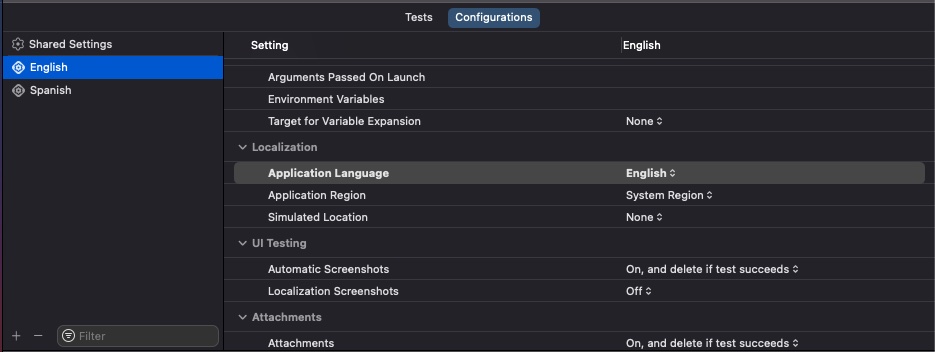 |
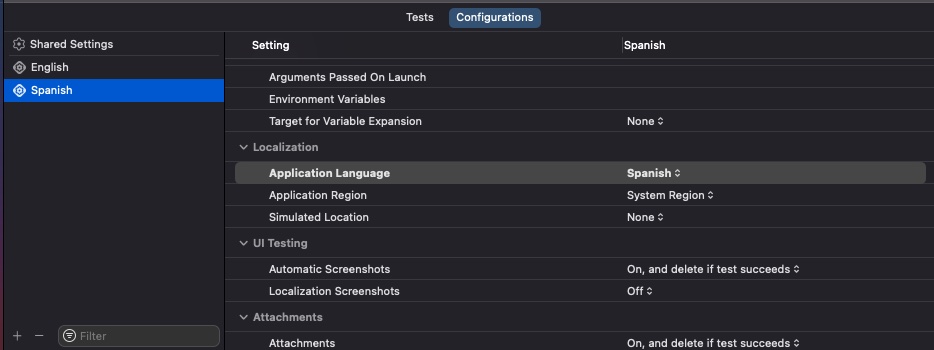 |
- Now all that’s left missing is adding our snapshot tests for Spanish. We’ll also tweak them so they don’t get executed when the device is English.
func test_initialRendering_forSpanishLocaleAtDarkMode() throws {
    // This test will be skipped if current device's languege is English
    try XCTSkipIf(Locale.current.languageCode == "en")
    verifyRendering(for: .iPhone8, testName:  #function)
    verifyRendering(for: .iPhone8Plus, testName: #function)
    verifyRendering(for: .iPhone12ProMax, testName: #function)
    verifyRendering(for: .iPhone8(.landscape), testName: #function)
    verifyRendering(for: .iPhone8Plus(.landscape), testName: #function)
    verifyRendering(for: .iPhone12ProMax(.landscape), testName: #function)
}
💡 Very important: use XCTSkipIf for the English tests so they get skipped when running Spanish environment.
After running the test suite again (⌘ + U), it’ll get execute twice in order to check both languages 👏🏽
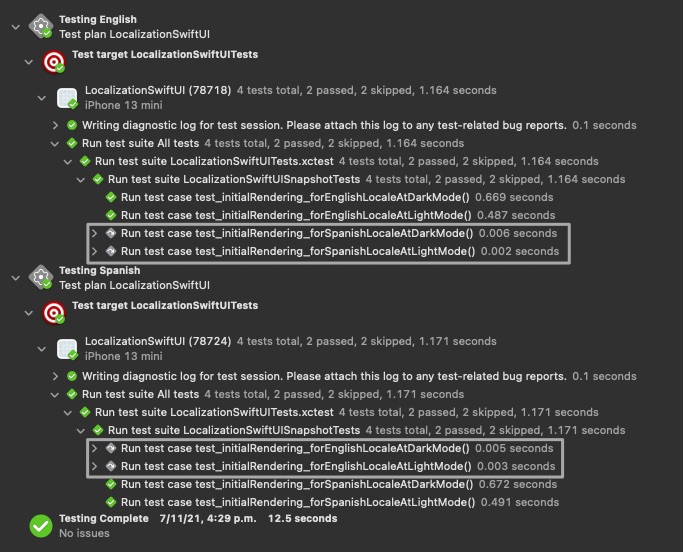
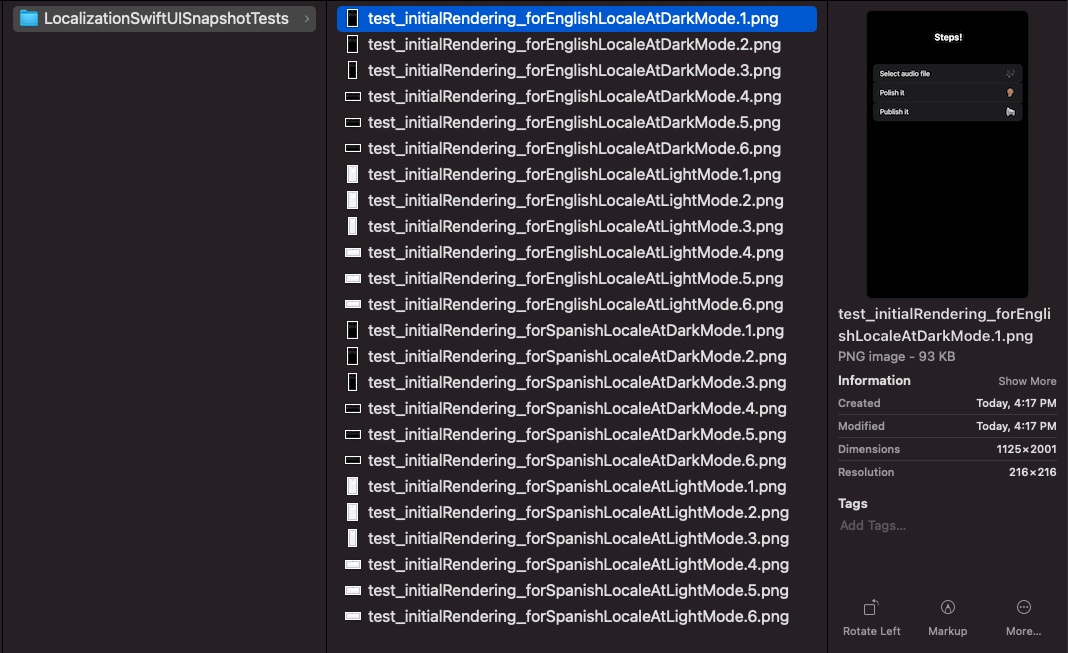
We’re left with all the anchor images permutations stored for later comparisons.
Final thoughts
There’s a place in the testing pyramid for manual verification but it’s reserved for hard to replicate edge cases. For more mundane layout and general UI validations, Snapshots are usually good enough.
Nevertheless it’s worth mentioning the toll they incur in performance. Unit tests are blazing fast (usually under 1 ms each one). Snapshots are on average 100 times slower, therefore we should be careful not to relay so heavily on them.
As always, there’s no silver bullets regarding software development. There will be times when it makes sense to pay for the performance penalty in order to cover a legacy screen, just to mention a common scenario. Each context is different so let’s not paint ourselves into a corner only for following “best practices”. Happy testing 👨🏽💻👋🏼


